Docker Storage and Volumes: A Comprehensive Guide
June 27, 2023 Leave a comment
Docker revolutionized containerization by providing a flexible and portable platform for deploying applications. One crucial aspect of Docker is storage management, which involves handling data persistence, sharing, and different storage drivers and models. In this blog post, we will explore Docker storage and volumes in depth, covering storage drivers, storage models, storage layers, Docker volumes, bind mounts, and their usage. Additionally, we will provide examples and commands to illustrate concepts effectively.
Storage Drivers: Devicemapper and Overlay
Devicemapper:
The Devicemapper storage driver is widely used and provides copy-on-write snapshots and thin provisioning. Block devices are used by devicemapper driver dedicated to Docker and operates at the block level, rather than the file level. These devices perform better than using a filesystem at the operating system (OS) level. It supports two modes: Loop LVM and Direct LVM.
Loop LVM Mode:
Loop LVM mode creates a sparse file as a block device and utilizes loop devices to map those block devices. To create a Docker container using the Devicemapper driver with Loop LVM mode, use the following command:
$ docker run --storage-driver=devicemapper --storage-opt dm.loopdatasize=<size> <image_name>
Direct LVM Mode:
Direct LVM mode leverages logical volumes to store container data directly on block devices. To use the Devicemapper driver with Direct LVM mode, follow these steps
1- Create a volume group (VG):
sudo vgcreate <vg_name> /dev/<block_device>
2- Create a logical volume (LV):
sudo lvcreate --wipesignatures y -n <lv_name> -l <extents> <vg_name>3- Format the logical volume with an appropriate file system:
sudo mkfs.<fs_type> /dev/<vg_name>/<lv_name>
4- Mount the logical volume:
sudo mount /dev/<vg_name>/<lv_name> /path/to/mount/point5- Configure Docker to use the Devicemapper driver with Direct LVM mode by editing the Docker daemon configuration file:
sudo vi /etc/docker/daemon.json6- Add the following configuration:
{
  "storage-driver": "devicemapper",
  "storage-opts": [
    "dm.directlvm_device=/dev/<vg_name>/<lv_name>",
    "dm.thinp_percent=<percent>",
    "dm.thinp_metapercent=<meta_percent>"
  ]
}
Restart Docker for the changes to take effect:
$ sudo systemctl restart docker
Overlay:
The Overlay storage driver offers efficient storage utilization through layered file systems. To utilize the Overlay driver, specify it during the Docker daemon configuration and restart the Docker service. The Overlay driver does not require specific mode configurations like the Devicemapper driver.
sudo vi /etc/docker/daemon.json

{
  "storage-driver": "overlay2"
}

sudo systemctl restart docker
By understanding the various modes available within the Devicemapper storage driver and utilizing the efficient Overlay driver, you can optimize your Docker storage configuration for improved performance and resource utilization.
Storage Models: File System, Block Storage, and Object Storage
File System:
Docker’s default storage model is the file system, which provides isolation between containers. To create a container using the file system storage model, use the following command:
$ docker run -v /path/on/host:/path/in/container <image_name>Usage:
- The file system storage model is suitable for most general-purpose applications that do not have specific storage requirements.
- It provides a lightweight and efficient way to manage data within containers.
- Containers can read from and write to files and directories within their own file system, providing isolation from other containers.
Advantages:
- Lightweight: The file system storage model imposes minimal overhead on the host system resources.
- Isolation: Each container has its own isolated file system, preventing interference from other containers.
- Direct File Access: Containers can directly access files and directories within their own file systems.
Disadvantages:
- Lack of Persistence: When a container is removed, any changes made within its file system are lost unless explicitly saved.
- Limited Data Sharing: Sharing data between containers using the file system model requires additional coordination and synchronization mechanisms.
Block Storage:
Block storage enables the creation of volumes from external storage devices or cloud providers. It provides long-term data storage that persists even after containers are terminated or restarted. To create a volume using block storage, use the following command:
$ docker volume create --driver <driver_name> <volume_name>Usage:
- Block storage is well-suited for applications that require data persistence and sharing between containers.
- It is commonly used for databases, file servers, and stateful applications where data integrity and long-term storage are crucial.
Advantages:
- Persistence: Data stored in block storage persists even after container restarts or termination.
- Scalability: Block storage solutions, such as cloud block storage, offer the ability to scale storage capacity as needed.
- Data Sharing: Multiple containers can access and share the same block storage volume, enabling data consistency and collaboration.
Disadvantages:
- Complex Setup: Configuring and managing block storage solutions may involve additional steps, such as provisioning and attaching storage devices or using cloud storage APIs.
- Performance Considerations: The performance of block storage solutions can vary depending on factors such as network latency and disk I/O.
Object Storage:
Object storage allows storing and retrieving objects in a distributed and scalable manner. Object storage models store data as discrete objects, each with its unique identifier. These models are highly scalable, distributed, and designed for storing vast amounts of unstructured data. To utilize object storage in Docker, you can use plugins like the Docker S3 plugin.
Usage:
- Object storage is suitable for applications dealing with large amounts of unstructured data, such as media storage, backups, and content delivery systems.
- It provides durability, scalability, and accessibility across distributed systems.
Advantages:
- Scalability: Object storage can handle massive amounts of data, making it suitable for applications with high storage requirements.
- Durability: Objects stored in object storage systems are redundantly distributed, ensuring data integrity and resilience against hardware failures.
- Accessibility: Object storage can be accessed over standard HTTP/HTTPS protocols, making it easily accessible from anywhere.
Disadvantages:
- Eventual Consistency: Object storage systems may have eventual consistency, meaning changes made to objects may not be immediately reflected across all replicas.
- Limited Random Access: Retrieving specific parts of objects stored in object storage can be less efficient than accessing file systems or block storage directly.
Storage Layers: Layered File System
The layered file system is a fundamental concept in Docker that enables efficient image building and storage utilization. It works by employing a union file system, which allows combining multiple file systems into a single view. Each layer in the file system represents a set of changes or additions to the previous layer, forming a stack of layers.
Working of Layered File System:
- Base Image: The layered file system starts with a base image, which serves as the foundation for subsequent layers. The base image is typically an operating system or a preconfigured image that forms the starting point for building containers.
- Layer Stacking: As new layers are added to the image, they are stacked on top of the base image layer. Each layer represents changes or additions to the file system, such as installed packages, modified files, or created directories.
- Copy-on-Write: The layered file system employs a copy-on-write mechanism, ensuring that modifications in upper layers do not affect the lower layers. When a container is created from an image, a new layer is added, forming a container layer. Any modifications made to files or directories within the container are stored in this layer, leaving the underlying layers unchanged.
- Efficient Utilization: Since each layer only contains the differences from the previous layer, the layered file system optimizes storage utilization. It avoids duplicating the entire file system for each container, resulting in reduced storage requirements and faster container creation.
Union File System Structure:
The union file system is responsible for merging the layers and presenting a unified view of the file system. It combines the directories and files from each layer into a single virtual file system, allowing containers to access and modify the files as if they were in a traditional file system.
The union file system operates with three key components:
- Upper Layer: The upper layer is the topmost layer in the stack. It contains the changes and additions specific to the container, such as modified files or newly created data.
- Lower Layers: The lower layers are the layers below the upper layer. They contain the unchanged files and directories inherited from the base image and any intermediate layers.
- Mount Point: The mount point is the location where the unified view of the file system is presented. It combines the files from the upper layer with the lower layers, creating a single cohesive file system accessible by the container.
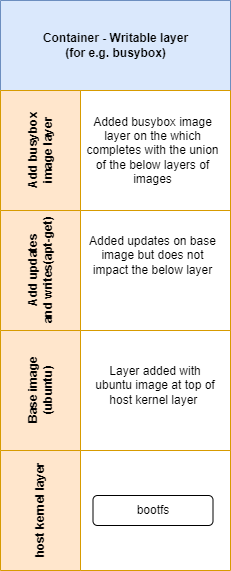
The diagram illustrates the layered file system structure, with the base image at the bottom and subsequent layers stacked on top. The union file system merges the layers into a single view presented to the container.
By utilizing the layered file system and the underlying union file system, Docker achieves efficient image building, storage utilization, and isolation between containers. This approach allows for rapid and lightweight container creation and enables easy management and distribution of containerized applications.
Docker Bind Mounts and Volumes
Bind mounts allow host directories or files to be directly mounted into a container while docker volumes provide a way to persist data generated and used by containers. Unlike the file system within a container, which is ephemeral and gets destroyed when the container is removed, volumes allow data to be shared and preserved across multiple containers. Understanding Docker volumes is crucial for managing data that needs to persist beyond the lifecycle of a container.
Bind Mounts
Bind mounts are a straightforward way to create a volume by mapping a directory or file from the host machine into a container. This allows the container to directly access and modify the files on the host.
To create a bind mount, you specify the source path on the host and the target path within the container when starting a container. For example:
docker run -v /path/on/host:/path/in/container <image_name>
Advantages of Bind Mounts:
- Flexibility: Bind mounts enable easy sharing of data between the host and the container, making it convenient for development and debugging scenarios.
- Direct Access: Changes made to files within the bind mount are immediately visible on both the host and the container.
- Host File System Integration: Bind mounts provide access to the host’s file system, allowing the container to interact with existing data and configurations.
Disadvantages of Bind Mounts:
- Coupling with Host: The container’s functionality is dependent on the presence and state of files on the host machine, which can introduce coupling and potential issues when moving containers across different environments.
- Limited Control: Bind mounts do not provide fine-grained control over data management, such as data isolation or versioning.
Docker Volumes
Docker volumes are managed by Docker and provide an abstraction layer for handling persistent data. Volumes are not tied to a specific container or host directory but exist independently within the Docker ecosystem.
To create a volume, you can use the docker volume create command or let Docker automatically create one when running a container with the -v flag. For example:
docker run -v :/path/in/containeradvantages of Docker Volumes:
- Data Persistence: Volumes ensure that data remains intact even if a container is removed or replaced. Volumes can be shared and reused across multiple containers.
- Portability: Docker volumes abstract away the underlying storage implementation, making it easier to move containers between different environments without worrying about the specific host file system structure.
- Scalability: Volumes can be used to provide shared data across multiple instances of a service, enabling scalable and distributed applications.
Disadvantages of Docker Volumes:
- Learning Curve: Working with Docker volumes may require additional knowledge and understanding compared to bind mounts.
- Management Overhead: Managing a large number of volumes can become complex without proper organization and naming conventions.
Understanding the differences between bind mounts and Docker volumes allows you to choose the most appropriate approach for managing your container’s data. Bind mounts offer flexibility and direct host access, while Docker volumes provide better data isolation, portability, and scalability. Consider your specific use case and requirements when deciding between bind mounts and volumes.
Comparing Bind Mounts and Volumes
Advantages and Disadvantages:
- Docker volumes provide better isolation, while bind mounts offer direct access to host files.
- Volumes are more portable and easier to manage, while bind mounts provide real-time data synchronization.
Usage Scenarios:
- Use volumes for database persistence and shared data storage.
- Utilize bind mounts for configuration management and accessing host-specific resources.
Conclusion:
Docker’s storage management plays a crucial role in containerized environments, allowing for data persistence, sharing, and efficient utilization of resources. By understanding storage drivers, storage models, storage layers, Docker volumes, and bind mounts, you gain the ability to design robust and scalable containerized solutions. As you continue your journey with Docker, leverage the power of storage management to optimize your applications and unlock the full potential of containerization.


